
Smash through some walls and build a new walk in closet! Come see how we did it!
1. Find the Right Spot
This closet is being built in my boys’ upstairs bedroom. I know, I know, we already built them a closet into the attic, but surprise, four boys need more space. Their room has angled ceilings that match the roof rafters above it. Our house is set up in a cross-shaped configuration, so this vaulted run is bisected with another angled roof line. In the previous closet project, you saw us access this extra attic space and we’re going to be doing that again in a different area.
When we made my boys a large cherry dresser, we placed it in a space that has an elevated floor at one end of the room. This little nook will be perfect for this walk in closet space. Using the attic access door that we made in the last closet build, I awkwardly crawled in the roof area, around the back of their bathroom, and behind the proposed new closet opening. The floor was significantly lower than the elevated floor in the nook, but the space was about 8 feet (2.4 meters) wide and could totally work for another closet.
2. Frame the Space
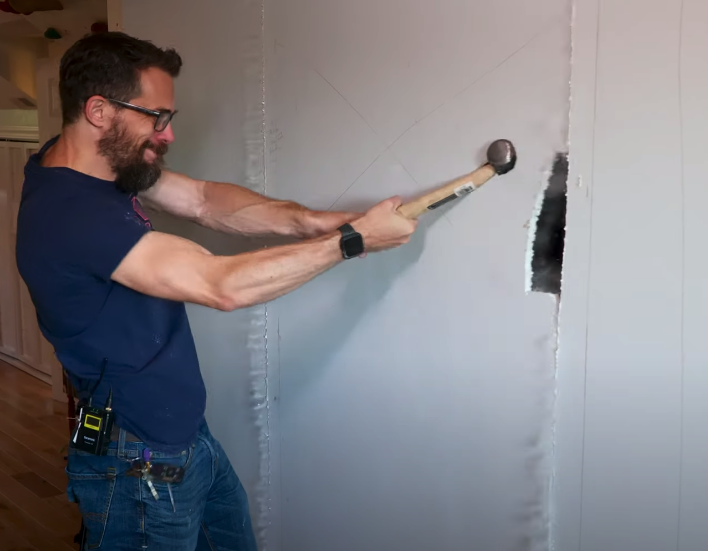
Like all North American walls, this one contained vertical studs 16 inches apart. The goals was to bust through the gypsum wall, remove enough studs to make a 36 inch wide opening, and the build in additional framing so the roof above the opening was adequately supported. This is the fun part. Demolishing the opening is fun, but you have to plan ahead. There’s no use in smashing something just to repair it later. I drew out the boundary of the new door and removed the baseboards. I used the side (not the face) of a heavy sledgehammer to break up large sheets of the drywall. This method makes it easier to clean up the area once the carnage is done.
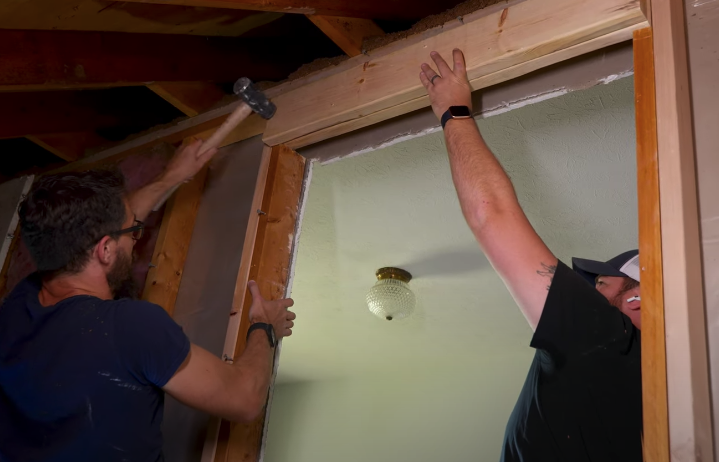
Next, I used a reciprocating saw to cut out the wooden studs. To support the area above the doorway, I nailed together two 2x6s to act as a header beam. This header was supported by some 2x4s nailed into place on the edges of the doors way. These shorter jack studs are best nailed to a full-height 2×4 to help with stability and reinforcement. Once the framing was nailed in place, the opening was complete.
Now to address the uneven floor. I have to raise the floor in the new space up 12 inches. I built a drop-in framed 2×6 box that will sit on other support joists attached to the existing floor. Using some framing hardware, I nailed the new elevated platform into place which was short enough to allow for hardwood flooring on top. I repeated the wall framing by make drop-in sections for the sides of the closet and two sections of the wall opposite the opening. Before I can add drywall, I hung up insulation in the entire space. I made sure to bring a sheet of foam insulation board to cover the rough opening when I finished work for the day. You don’t want kids or animals getting lost in the exposed attic rafters.
3. Flooring, Drywall, & Shelves
Now that the walk in closet is framed I can add the drywall. I. Hate. Drywall. But, unfortunately, it is a necessary step in remodeling a room. Simply, the drywall process is screwing gypsum drywall panels to the studs, taping the seams with special tape, applying joint compound over the tape, and sanding that mess smooth. After that, I added the same hardwood flooring that’s in the rest of the room. I was happily surprised with this transition into the closet. The platform was positioned well, so the floor was nice and even.
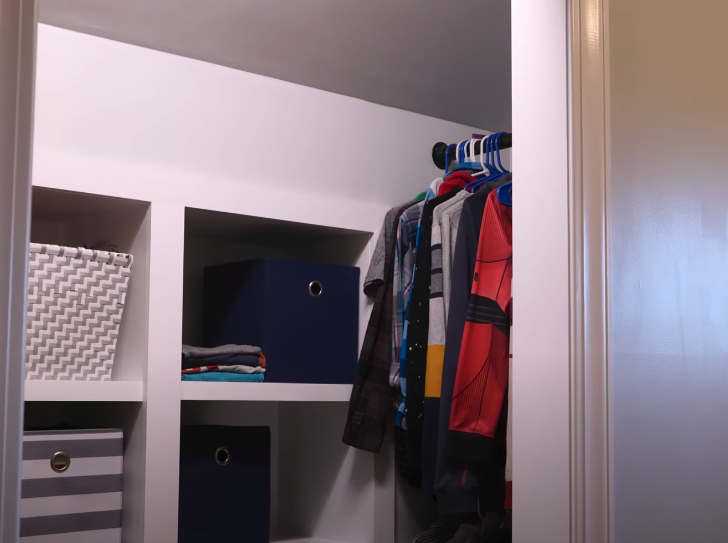
Once the floor was in and the drywall was smooth, Josh made two shelving units that I could place into two openings in the back wall. I purposefully omitted drywall in these areas so that we could flush-mount the units into the open attic space. Once the shelving units were finished, we screwed them to the framing so the faces lined up with the drywall. I then used simple 1×3 material to trim the units and cover the seams. The walk in closet was now ready for paint.

4. Finishing
Remodeling projects are often hard to visualize when you start. It may be even harder to see the end result when you’re smashing holes in the wall. At this stage, the drywall is mudded, the plywood shelves are installed, and the hardwood floors is done. I can see the newly shaped space, but it looks kinda ugly. If you’ve done all the previous steps correctly; aligned trim, sanded drywall, and closed gaps, adding paint will really transform the area. I was really happy with how light and open the closet looked after a few coats of paint.
Earlier in the project, I moved an electrical outlet outside the closet and used that circuit to add a light and a switch. Now that the paint was dry, I could add the overhead light and the switch covers. Because this closet is meant to address my kids’ storage needs, I added two rungs of clothing rods on each end of the space. With the addition of some storage baskets in the shelving units, the walk in closet was done.

Build to Fit Your Needs
I sure hope that I don’t need to build another closet in the upstairs room, but if so, I’ve had a lot of practice. Your home should be functional to fit the needs of your family. Our work at I Like To Make Stuff is to empower you to make your life better through DIY projects and how-to content. If you need more space, go look for it, and build it just like I did. Be sure to check your local building codes, and don’t do anything that you are comfortable with. But if coding isn’t an issue for you, we’ve shown you that projects like these are totally possible.
We do plan on making a door, but I’ve got something crazy in mind for that, stay tuned.
Tools List:
(purchasing via these affiliate links supports ILTMS)
Woodworking:
- Skil circular saw
- Dewalt 20v drill driver combo
- Dewalt Miter Saw
- Countersink drill bits
- DeWalt 20v framing nailer
- DeWalt 20v brad nailer
- Pancake compressor/nail gun combo
- 54″ Drywall T-Square
- Shop Fox Hanging Air Filter
- 2HP Dust Collector
- 1 Micron bag
- Speed square
- 90˚ corner clamp (4 pack)
Other Stuff: