We replaced an old-outdated, wobbly stair railing with a new, modern stair railing made of steel and hardwood. You can update your home with a beautiful and functional piece that wasn’t that difficult to make.
1. Start with a Good Design
Making modern stair railings can be a tricky project. On one hand, you may want a minimal look with sleek materials, but you will have to consider building codes. In most places, the balusters, or the vertical poles in the railing, have to be less than 4-inches apart. They also need to withstand 50-pounds of pressure being placed on a square inch. This way, a child or animal can’t force their head in between them and get stuck. So, armed with this knowledge and a desire to be chic and modern, Anthony designed a beautiful stair railing set that is up to code.
Using Fusion 360, Anthony designed the stair railing’s rectangular frames using some oak 4×4 posts available at a local hardware store. He needs an L-shape railing to cover enclose the stairs leading to his basement. Inside this hardwood frame, he chose to add chevron-patterned steel bars. To top off the whole railing unit, Anthony wants to add a thick cherry banister that will waterfall down one side. Armed with this amazing design, we got to work.
2. Assemble the Frames
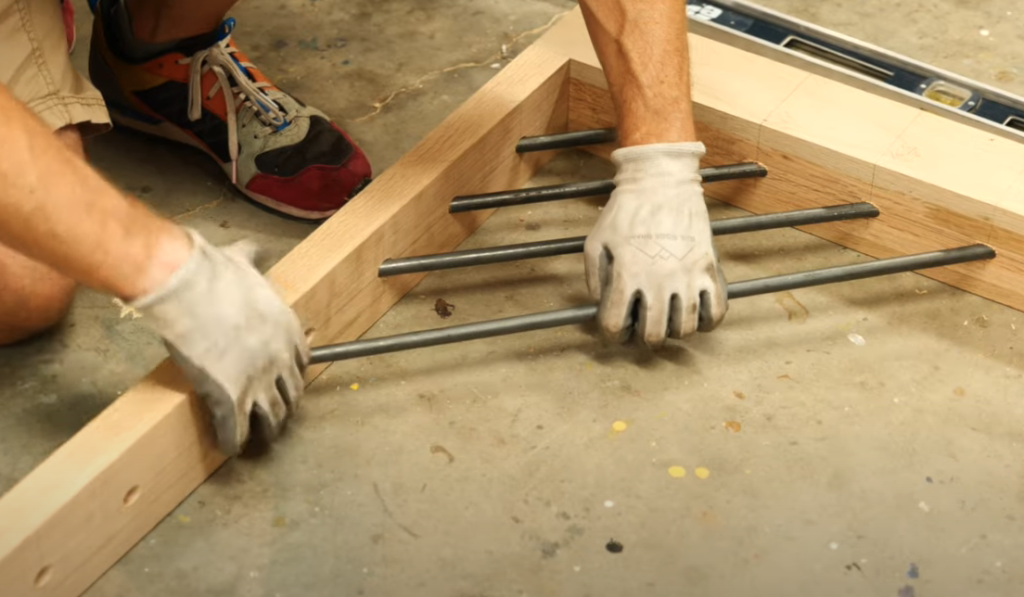
Because we bought the 4×4 posts, they were already dimensionally accurate, we didn’t have to mill them. We did, however, need to join them together using a combination of dowels and dado cuts. I used the table saw and my cross-cut sled to cut the large dado slots in the vertical oak posts. Once all of the posts had the dado slots cut and the dowels installed, I could do a dry assembly. We built this L-shaped stair railing in two frames so that we could maneuver them more easily. The longer frame had two rectangular chevron ares and the shorter had one.
Once I was satisfied with the railing’s fit and shape, I had to disassemble it to add the holes that will hold all of the steel bars. Anthony used his Fusion 360 model to measure the rod placement within the frames. I transferred these measurements to the oak posts with a long level and marked the positions. This part of the project was tricky. I had to make sure that each hole is drilled at a specific angle and a consistent depth. Rockler sent us their Drill Press Guide so we could drill prefect holes at the perfect angle for each steel rod. Anthony then painted the frames black and the rods gold. Assembling the oak frames and all of those steel rods was not easy and I had to have help, but once it was all together, it looked fantastic!
3. Install Mounting Hardware
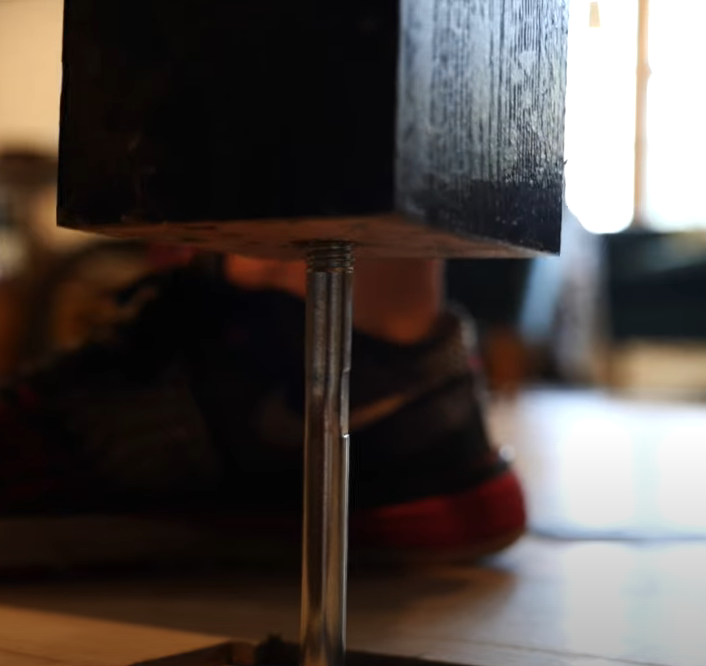
To mount stair railing to the floor in your house, you can use a pre-made hardware kit. The kit has a long threaded rod, a cupped washer, and a nut. You start by setting the assembled railing in place and marking the post positions on the floor. Next, using the center point of those marks, drill into your floor and thread the rough part of the rod down in to it. After that, you drill up into the bottom of the railing’s posts and also a larger hole into the face of the posts to make an intersecting space.
We lifted the whole railing up and onto the threaded rods which we could access through the side holes. I threaded on the washer and nut until they were super tight and used the included wooden plug to cover the hole. Where we could, Anthony drive in large lag screws through the railing, into studs on the existing wall where the L-shape touched. At this point, the thick stair railing was fixed in place and it looked really cool. But we’re not done yet.
4. Add a Cherry Banister
You may have noticed that we’ve been using a lot of cherry hardwood lately. That’s because Anthony, Josh, and I bought a truck full of rough sawn cherry from an auction. Anthony wanted to use some of this thick cherry to cap off the top of the stair railing as a banister. Now that the railing itself is mounted in place, he and Josh milled up the long pieces into flat and square boards. Anthony use some polyurethane to protect the wood over time. He had to cut 45-degree miters to connect the L-shape and a bevel to front to connect the waterfall. Once all of the cherry pieces were secured to the frames with large screws, the railing was done.

Safe and Beautiful Stair Railing
Anthony and his wife are super happy with the new modern stair railing. He did a fantastic job using Fusion 360 to design and model the stair railing. It is an extremely useful too that he learned by taking our online course all about modeling with Fusion 360. If you want to design and make things like this in your home, check out the course at www.fusion360formakers.com!
Tools List:
(purchasing via these affiliate links supports ILTMS)
Woodworking:
- SawStop cabinet saw
- 8″ Dado stack
- Dewalt 20v drill driver combo
- Orbital Sander
- Dewalt Miter Saw
- Dewalt DW735 benchtop planer
- Push Blocks
- Shop Fox 6″ Jointer
- Shop Fox Hanging Air Filter
- 2HP Dust Collector
- 1 Micron bag
- Speed square
- Digital Angle Gauge
- Classic steel ruler (cork backed)
- Flush cut saw
Finishes & adhesives I like:
Welding:
Other Stuff: