
Not too long ago, I finally decided it was time to build a dedicated shop. For the past six years, my converted two car garage was one big space that held my office, my music studio, our laundry and all of my shop stuff (tools, bench, lumber, etc.) I’ve always had to drag tools outside to use them, to avoid making a mess around my computer and instruments. I’d gotten used to it, and it wasn’t too bad until I got a bandsaw.
I was SO excited about using the bandsaw, but it was a huge issue to drag it outside and back in, and this process made me look at how much time I was spending in moving tools and materials outside, using them, cleaning up, moving them back in… I found that a single wood cut, which took about 30 seconds, took me 5-10 minutes and a lot more effort than it should. It was time to erect a wall, to split my office into dedicated spaces.
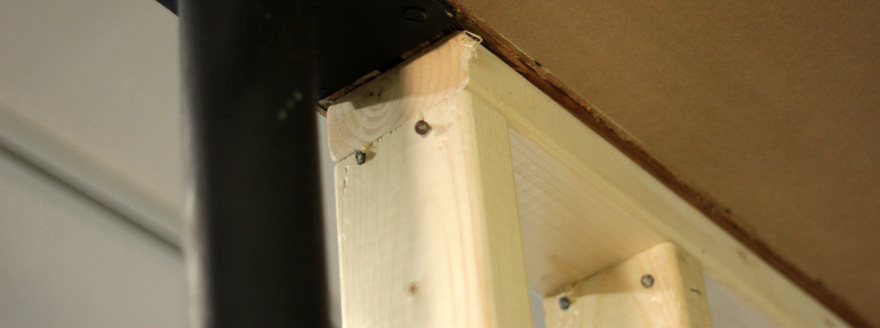
In my particular space, there was a header that ran right down the middle of the space and it was supported by two steel poles. This header was in a great position for the wall, so I just decided to use it and build a partially supporting wall underneath it. If you didn’t have this beam, you could do this exact same process but extend the wall height all of the way up to the ceiling.
Another option, that may be simpler if it works in your situation, is to frame the wall laying down on the floor, then raise it up in to place. But for the sake of education, let’s talk about the more difficult way to do it.
Here’s what you’ll need:
(These are affiliate links, using them for purchases helps me out!)
- Nail Drive Anchors
- Hammer
- Plumb bob
- Tape measure
- Pry bar
- 48-Inch Level
- lots of 2×4’s
Securing the top plate
Since I was building down from the existing header, the placement of my top plate was a no brainer. If you were just going to add a top plate to the ceiling of your room, you’ll need to find where you want it, and make sure that it’s square to the existing walls. This will take some time, lots of measuring, and probably snapping a chalk line on the ceiling to give you a solid line to build along.
Cut 2×4 to the correct length for your new wall. If it’s long, you may need multiple pieces, but try to minimize to total number of separate pieces in the top plate as much as possible. You’ll need to add a stud under each one of these joints, whether the stud spacing dictates it or not, as a precaution.
Once you’ve found your line where the wall should set, you’ll need to use a stud finder to locate the joists. (Depending on the direction of your wall, you maybe have already had to find these joists to set the placement of the top plate.) Make a mark on each joist next to, but not under, where the top plate will sit. These will guide you, once the plate is held in place, as to where you need to nail the top plate to the joists.
With some help, hold a 2×4 in place along your chalk line, and drive (or shoot) nails through the top plate into the joists.
Securing the base plate
Next, you’ll need to find exactly where to put your base plate, but it’s a little more involved that you might think. You have to make sure that it follows the exact same line as the top plate, so that they are parallel for the entire wall. This was one of the most tedious parts for me.
To do this, I used a plumb bob and hung it from both sides and both ends of the top plate. This showed me the four corners of where my base plate should be. As I was putting the base plate down, I constantly double checked that it was following the top plate, by rechecking with the plumb bob.
Go ahead and cut your base plate to length, just as you did the top plate, but if you’re add it to a concrete floor, you NEED TO USE PRESSURE TREATED LUMBER for it. Even inside, a concrete floor still transfers a certain amount of moisture and temperature difference that a wooden floor wouldn’t. Plus, if your room ever floods for some reason, you won’t have to worry about it rotting as easily.

Since my room is a converted garage, the floor is a concrete slab. Adding the baseplate to a wooden floor would be even easier, although this process isn’t very hard. Either way, you need to make sure that the baseplate is SECURELY fastened down. With concrete, you’ll most likely need to use some sort of concrete anchor. I decided to use a “nail drive anchor” which is a little simpler than some other options.
The anchor is a shaft, with a nail already set inside it (but not pushed down).
Before you start drilling holes and adding anchors, you need to measure out where the studs will sit on the base plate. This is to avoid putting an anchor down where a stud needs to go. The anchors that I used have a rounded head which would get in the way of the stud. Studs are traditionally place every 16″ on center (meaning that the middle of the stud is 16″ from the middle of the previous stud. To simplify the marking and nailing of my studs, I cut a piece of 2×4 to 14.5″ to act as a spacer
A 2×4 is actually 1.5″ thick. So, from the center of a stud it would be .75 “(outside half of that stud) + 14.5″ (spacer) + .75″ (outside half of next stud) = 16” on center.
Using the spacer and some short scraps of 2×4 as mock studs, mark the placement of all studs on the base plate.

Once that’s done, pre drill the holes in the base plate, set the base plate in place and transfer those marks to the concrete below (or drill them both at the same time). The anchors should be tight enough that they’ll need to be knocked down into the holes, but you can’t just hammer them from the top (the nail should be protruding still). I found the I could sit my small pry bar on the side/top of the anchor and gently hammer on the pry bar. This was enough force to knock the anchor down into place. Once the head of the anchor meets the base plate, just drive in the nail.
I would suggest rechecking the square (relative to the top plate) before and after each anchor is added, just in case you need to make adjustments along the way. Just note that the more anchors are in place (you don’t need many), the harder it will be to adjust/redo.

Adding the studs
The hard part is finished!! Cut your studs to length, making sure that they fit very snuggly between the top and base plates when they’re perfectly upright. If the stud needs a little knocking in place with a hammer, that’s perfect. This is important in case there is any load that the wall needs to carry, it will be transferred evenly to all of the studs, and not to just certain ones.
Add the first stud, at the end of the wall first. In my case, this was up against an existing wall, so I was able to set the stud in place easily. With the first stud set in place, toe nail the stud at the bottom, maybe sure it’s perfectly vertical using a level, then toe nail the top. Toe nailing, is nailing from the side, at an angle. The nail goes through the stud and ends in the plate. Use your level again, make it plumb, then toe nail the bottom of the stud.
Once the first stud is up, set the 14.5″ spacer in place, and you’re ready to add the next stud. Be sure to use the level on EVERY stud to make sure it’s perfectly upright.

Now do this over and over until you’ve finished the wall!!
Most likely, the final gap when placing the last stud won’t be 16″. This is just fine, 16″ is a maximum gap, anything under that is fine, just not required.
In some walls, you may have seen staggered horizontal pieces of 2×4 connecting the studs. These braces are generally only needed in shear walls to provide lateral support. If you’d building an interior wall, there’s little to no chance that you’ll need to put these in place.
Covering the wall
Once your framing is all complete, you’re ready to run electrical wiring through the studs, if you have any to run. I didn’t add any electrical, which helped be avoid having to get a permit, framing inspection, electrical inspection, etc.
When you’re ready to cover the wall, you have several options, but the most common is to use drywall. I won’t go over the process of hanging and mudding drywall here (because frankly, I hate it, and it makes me angry just thinking about it) but I will give one very helpful piece of advice. In between coats of drywall mud, one would typically sand down the rough sections. Sanding drywall mud is insanely messy and frustrating, but I found that you can get 90% of the EFFECT of sanding (and %5 of the mess) by using a wet grout sponge instead.
The water on the sponge softens the mud enough for it to fill gaps and be easy for the sponge to knock down the high points. I’ve used this process in two rooms now, and it’s a HUGE time and mess saver. When doing this, you only have to run over everything with sandpaper in the very last stage.
Anyway, in my situation, I put up drywall on the office side of my wall, but in the shop, I wanted something more useful. I added pegboard to the top 4′ of the wall. I added cut down sheets of OSB plywood to the bottom of the wall. This is really cheap material, and might not be the look you want to go for, but in a shop, it works pretty well (and you can always paint it).

This is definitely not an exhaustive explanation, and you’ll ALWAYS want to verify your plans with the local code, get the proper permits, etc. Hopefully this will help you make plans and get started as you build you wall!