
Getting this shed weatherproofed turned into more of an adventure than I expected. The roof was already on from last time, and theoretically water shouldn’t be able to get in. But I had a few giant holes to deal with—three windows, double doors, and all those gaps between the rafters on both the short and tall walls. Before I could even think about covering the outside or adding siding, I needed to seal everything up to keep out the weather, bugs, and whatever else might try to move in. But before any of that could happen, I wanted to talk about the comments on the last video. I know that might sound weird, but hear me out. The comments have been genuinely helpful, and I learned a lot from them. I’m not complaining at all—I’m actually grateful because these folks caught things I completely missed.
One commenter kindly pointed out that I forgot to put cripples underneath both sides of each window. If you don’t know what those are, they’re short vertical studs that help support the window sill. The fact that someone mentioned it in a nice, constructive way while I could still fix it made me really happy. I was able to go back and add them in, which I definitely wouldn’t have thought to do on my own. Another great comment was about how I sheathed the walls. When I built the front and back walls in four separate sections, I lined up the sheathing seams with the framing seams. A couple of people pointed out that if I had overlapped the sheathing over those seams, the whole wall would be more rigid. It makes total sense. Unfortunately it was too late to change it at that point, but the wall is plenty sturdy as it stands. I’ll definitely remember that trick for next time though.
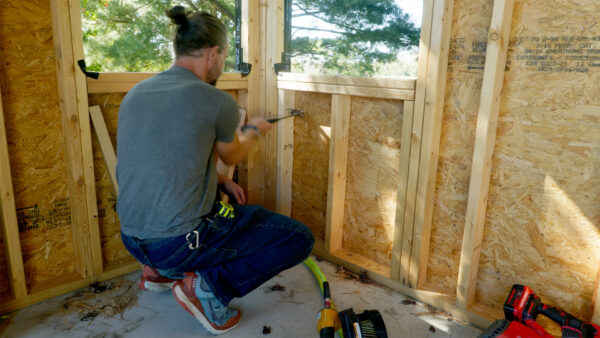
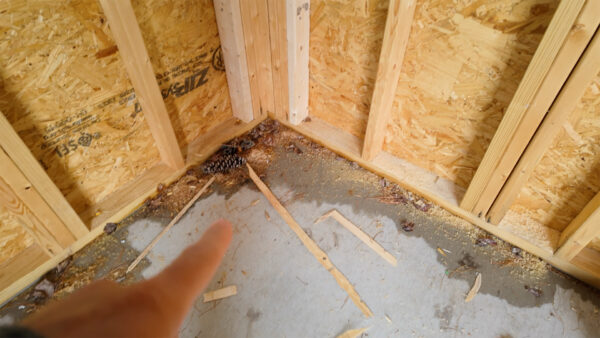
The first real task was filling in the gaps between all the rafters. These spaces needed to be sealed as tightly as possible to prevent airflow and keep bugs from finding their way in. I figured all the gaps should be the same size since the rafters were supposed to be evenly spaced, but I wasn’t that precise when I built them. That meant I had to custom cut each piece to fit. I started by trying to hammer them in from the front because I thought it would be easier for the camera to see. That turned out to be the hardest way possible to do it. One of the two by eights I was trying to wedge in just split right across the back, and both pieces got jammed in there. After fighting with that for a while, I realized it would be way easier to install them from the backside where the opening is bigger because of the sloped ceiling. You could just set a piece on the ledge and push it into place. Once I figured that out, the rest went much smoother.
Here’s the thing though—there’s an even better way to do this that I didn’t think about until it was too late. The absolute best time to install those blocks would have been before the sheathing went on. When there’s still an open gap between each rafter, you could just drop the blocks down from the top and nail them in place. You could even use them as spacers to make sure your rafters are exactly the right distance apart. But I didn’t think that far ahead, so I did it the hard way. Either way, those blocks just cover the big openings. I still had to seal them up with expanding foam, which I’d also need for the doors and windows. That meant it was time to start putting in the actual openings, starting with the windows.
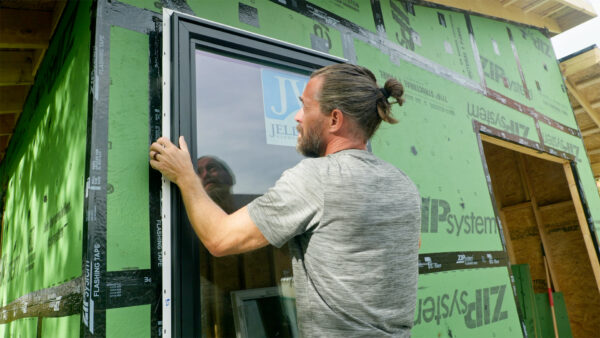
I spent a few days watching videos to figure out the best way to install windows. The basics are pretty straightforward. You run a bead of sealant on the two sides and the top, but not the bottom—you want water to be able to drain down and away from the window. Then you put the window in place, make sure it’s level and plumb, and nail it to the frame. After that you come back and cover everything with more tape. One mistake I made was framing the rough openings a little too small. I basically made them just big enough for the windows to fit, but you’re supposed to leave extra room so you can adjust and get everything level and square. Luckily when I did a test fit earlier, everything was level and square, so I got lucky. The windows fit tight enough that they didn’t fall out while I screwed them in place. The whole process went pretty smoothly, and after adding all the flashing tape around the edges, I felt good about how weathertight they were.

Then I ran into a bigger problem with the door frame. When I was getting ready to install the double doors, I realized I had made a pretty significant mistake—I framed the rough opening too high. The door frame didn’t fit right, and I had to come up with a solution fast. Luckily the fix turned out to be simpler than I thought. I cut a two by four to length and installed it along the top of the opening to bring the height down to where it needed to be. It wasn’t the way I planned to do it, but it worked perfectly and gave me a solid surface to attach the door frame to. Sometimes your mistakes end up being easier to fix than you think they’ll be, and this was definitely one of those times. The door frame fit correctly after that adjustment, and I was able to move forward with the installation.
The next challenge came after I got the windows installed and we had a big rainstorm. I checked all three windows top to bottom, and everything looked completely dry, which made me really happy. The floor inside was a different story though. Water had come in underneath the walls, but that actually made sense because I hadn’t finished waterproofing the bottom yet. When I put down the bottom plate earlier, I did use sill tape underneath it—this expanded foam stuff that keeps water from wicking up from the concrete into the wood. But it doesn’t stop water from going underneath the foam itself. I needed to do two more things to seal up that bottom edge. First, I used liquid flashing with a brush to seal the bottom edge of the wood and stop water from soaking in. Then I used a thick bead of polyurethane sealant to create a barrier that would stop water from going underneath and push it in the other direction instead.
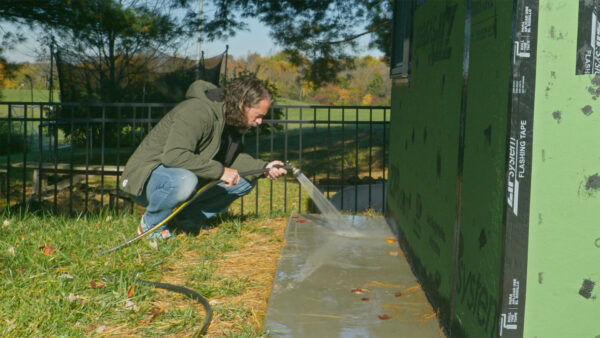
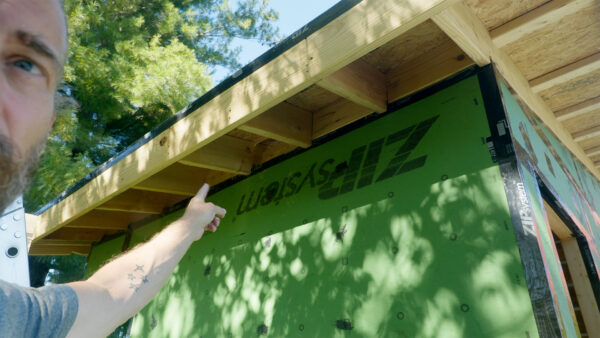
After making that fix and dealing with more rain, I wanted to really test if it worked. I took a hose and created almost a quarter inch of standing water up against the building. If it was going to leak, that should definitely show it. I went inside to check, and everything was completely dry. No water coming through at all. The standing water I created also drained off the wall really quickly, which was a good sign. There’s another solution I learned about from Matt Risinger that I wanted to mention in case anyone else runs into this issue. It involves cutting a small slot in the concrete and installing Z-flashing, which is this metal piece shaped like a Z. One part goes in the slot, another part goes up against the building, and then you tape it in place. The flashing costs about four bucks and creates a drainage path for any water that gets behind the siding. Matt used stainless steel flashing, and I’d probably go that route instead of the galvanized stuff I picked up. It’s a really smart and simple solution that I’ll keep in mind for future projects.
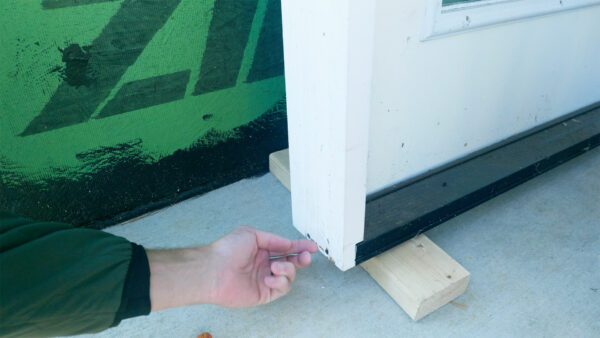
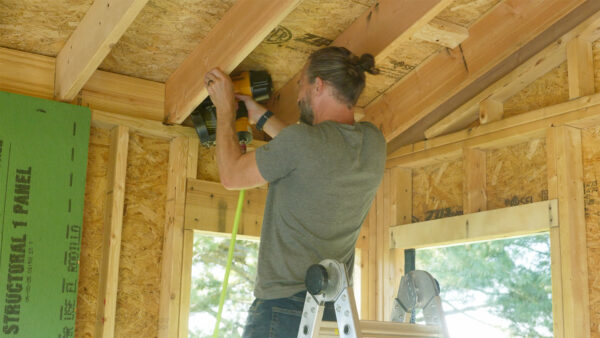
While I was working on the door installation, I also had to deal with the door frame itself. These are exterior French doors that I ordered over five years ago, and they have a wood frame with a metal threshold. The problem is that the wooden frame would be sitting directly on the concrete slab, which means that whole bottom section would be in contact with water. I didn’t want to deal with rot down the line, so I needed to fix it. I could have tried to paint or seal the bottom edge, but I don’t think that would have lasted very long. Replacing the entire frame would have been a huge pain since it has weather stripping and hinge mortises already cut into it. Instead, I decided to just replace the bottom piece with a section of PVC one by four. This stuff is solid PVC and will never rot. I cut out a chunk of the door frame and replaced it with the PVC, screwed it all together, and that should handle any water contact without issues. While I was at it, I also added rafter ties based on another helpful comment. These are simple metal brackets that connect each rafter to the wall, and they cost about 98 cents each. In really strong winds—whether from hurricanes or the tornadoes we get around here—a roof can actually be ripped off the walls. The rafter ties create a strong connection to keep everything together. They’re required by code in some places, and even though I don’t know if they are here, I put them in anyway for peace of mind.
Thanks for following along with this part of the shed build. It’s been a learning experience for sure, and I’m grateful for all the helpful feedback along the way. Now, go make something awesome!
TOOLS
(purchasing via these affiliate links supports ILTMS)
Woodworking
- SawStop cabinet saw
- 8″ Dado stack
- Skil circular saw
- Dewalt 20v drill driver combo
- Dewalt Miter Saw
- Jet Wood Lathe 12×21
- Carbide lathe tool set
- Countersink drill bits
- Dewalt DW735 benchtop planer
- Orbital Sander
- Pancake compressor/nail gun combo
- Dremel tool
- Incra box joint jig
- 54″ Drywall T-Square
- Push Blocks
- Jigsaw
- Shop Fox 6″ Jointer
- Grizzly 14″ Bandsaw
- Grizzly Drill Press (WAAAAY overpriced (3x) on Amazon, buy from Grizzly directly.)
- Jet Drum Sander
- Kreg Rip Cut (circular saw guide)
- Kreg R3 pocket hole jig kit
- Shop Fox Hanging Air Filter
- 2HP Dust Collector
- 1 Micron bag
- Speed square
- 11″ Digital protractor
- Digital Angle Gauge
- Classic steel ruler (cork backed)
- Taper jig
- Flush cut saw
- 90˚ corner clamp (4 pack)
- Box Cutters (for eva foam)
Finishes & Adhesives
- Spray lacquer
- 100% pure tung oil
- Formby’s tung oil finished (tung oil/varnish)
- Danish oil
- CA Glue (medium)
- CA Activator
- Barge Contact Cement
- Critter Spray Gun
- Polycrylic
- Polyurethane
- Spar Urethane
3d Printing/CNC/Laser
- Glowforge (laser)
- X-Carve (CNC)
- Ultimaker 2 Extended 3D printer
- Ultimaker 3
- Original Prusa i3 MK 3
- Form1+ SLA 3D printer
- Silhouette Portrait (vinyl cutter)
- All filaments, 3d printing supplies from MatterHackers
Welding
- MIG welder *
- TIG welder
- Welding mask (auto darkening)
- Welding gloves
- Welding magnet
- Angle grinder *
- Cut off wheels
- Metal cutting bandsaw *
- 10″ Evolution Miter Saw for cutting Steel, Aluminum, Wood, etc.
Electronics
- Arduino Uno (just the Uno)
- Arduino Uno Kit
- Arcade buttons
- Raspberry Pi 3
- Multimeter
- Wire
- jumpers (Male to Female)
- Soldering iron
- Third hand kit
- Wire strippers (not the ones I have, but good ones)
- Thin solder
- Anti static mat
- Fiskars cutting mat
- Plastic parts cabinet (24 drawer)
- Plastic parts cabinet (64 drawer)
- Precision Screw driver kit