
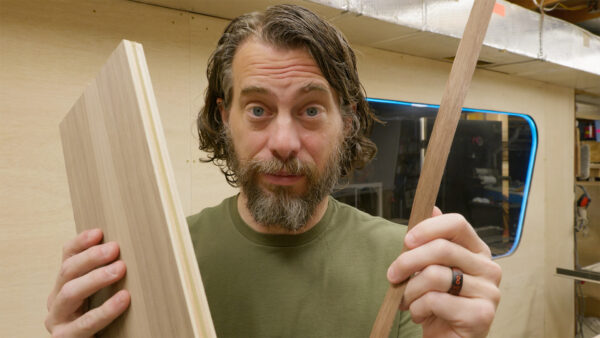
I think I’ve put miles of edge banding on plywood over the years. Last week, I made a bed almost entirely out of plywood, and it required a ton of repetitive work – like measuring and cutting pieces of edge banding for each of the drawers. While making it, an idea hit me: why not build a machine to dispense exact lengths of edge banding? I thought about using an Arduino with a number pad so I could type in the length I wanted, and then a stepper motor would push out that length through a slot. It seemed simple enough in my head, but as with most shop projects, the reality turned out to be a bit more complicated.
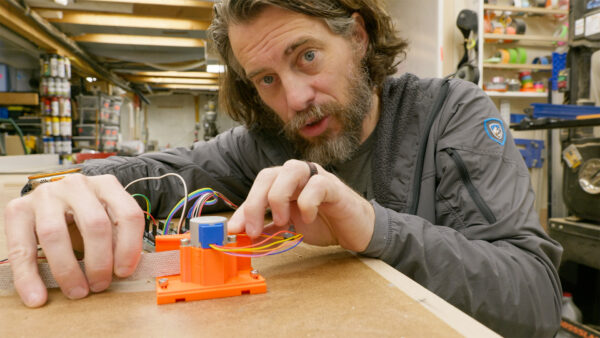
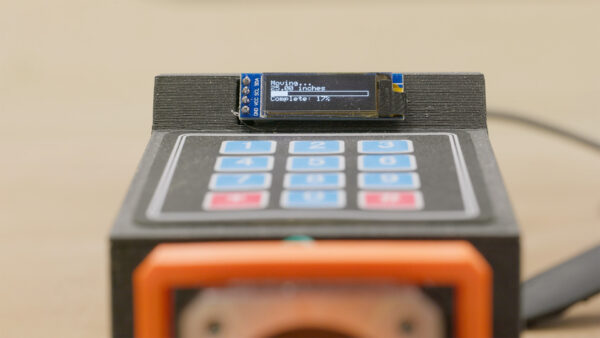
The system I designed used some basic components that work well together. I started with a membrane keypad that hooks directly into the Arduino, along with a free library that makes reading the numbers easy. For the mechanical part, I chose a basic stepper motor with a control board that’s simple to connect. To keep track of the measurements, I added a tiny LCD screen that displays the numbers as you type them. All these components connect to an Arduino Uno microcontroller, and they work together with some code I wrote. The idea was straightforward – type in a length on the keypad, hit the pound button, and the motor would turn just enough to push out that exact length of edge banding.

Before getting too deep into the electronics, I needed to design some parts. I modeled a flexible drive wheel that would grip the edge banding and push it through the machine. This wheel was printed in a flexible material with low infill, giving it some squish so it could compress against the edge banding and drive it forward. I also designed a mount for the motor and a way to adjust the pressure on the edge banding. The first tests showed that my basic stepper motor didn’t have enough torque to push the edge banding consistently, so I had to redesign everything to work with a more powerful motor and different driver.
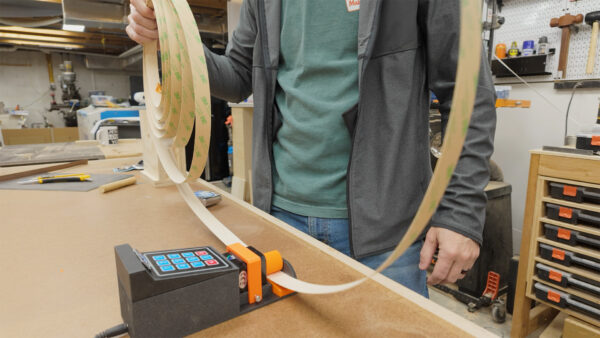
My original concept was probably too complicated. I initially imagined a big plate that would sit on the workbench, with the edge banding feeding through a slit and controls on top. But this would take up too much space in the shop. Then I realized what really mattered was just the drive mechanism. I redesigned the whole thing as a compact box with a slit for the edge banding to go in one side and come out the other, with all components self-contained inside. This made much more sense – I could just set it on the bench when needed and put it away when I was done.
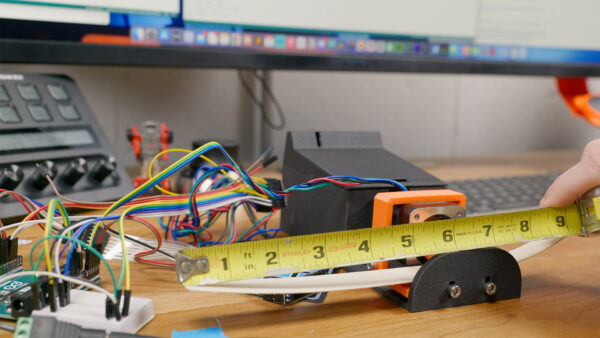
After a few days of fighting with redesigns and code issues, I finally got to test the new version. I typed in 5 inches, fed the edge banding through until it was just at the end of the slit, and hit go. The machine worked! The edge banding moved through smoothly, though my math was wrong at first (easy to fix in the code). The real challenge had been getting enough torque and friction to push the material through, but the stronger motor solved that problem. I crammed all the electronics inside the box, though typical makers would probably solder everything together instead of using a breadboard like I did.
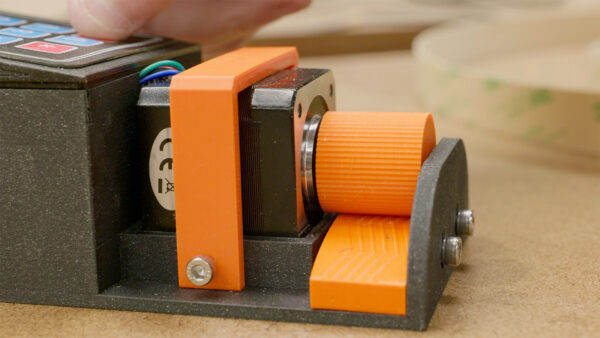
When I finally took the finished dispenser into the shop for a real test, I ran into some unexpected issues. The orientation of the drive motor meant the device couldn’t lay flat on the table anymore, so I had to make a temporary holder. There were also problems with tension and the edge banding getting hung up. I realized that maybe I needed to add some tread to my drive wheel to make it grip better, or perhaps have two drive wheels turning in opposite directions. These are improvements I could make in a future version.
Eventually, I got the edge banding dispenser working well enough to consistently spit out the right length of material. Would I use this thing all the time for my next edge banding project? Probably not, to be honest. But it was really cool to have an idea to solve a problem and then actually build something that worked. I think it would be even more useful if it had an automated chopper at the end to cut the edge banding after dispensing, though that would make it a bit more dangerous. I still have more to learn about getting stepper motors to move smoothly and consistently, but overall, it was a satisfying project that pushed my skills forward.
If you’re interested in projects like this one, I have two online courses that might help. Our Fusion for Makers course teaches you how to take an idea and build a working 3D model that you can send to a 3D printer or CNC machine. We also have an Arduino for Makers course that covers the basics of connecting electronics and writing code to make your ideas work. Both courses give you everything you need to bring projects like this to life in your own shop. We also have an Essential Arduino Kit with almost everything needed for this project available on our website. Either way, the whole process was a learning experience and it really did work great in the end. Thanks for following along on this one. Now, go make something awesome!
TOOLS
(purchasing via these affiliate links supports ILTMS)
Woodworking
- SawStop cabinet saw
- 8″ Dado stack
- Skil circular saw
- Dewalt 20v drill driver combo
- Dewalt Miter Saw
- Jet Wood Lathe 12×21
- Carbide lathe tool set
- Countersink drill bits
- Dewalt DW735 benchtop planer
- Orbital Sander
- Pancake compressor/nail gun combo
- Dremel tool
- Incra box joint jig
- 54″ Drywall T-Square
- Push Blocks
- Jigsaw
- Shop Fox 6″ Jointer
- Grizzly 14″ Bandsaw
- Grizzly Drill Press (WAAAAY overpriced (3x) on Amazon, buy from Grizzly directly.)
- Jet Drum Sander
- Kreg Rip Cut (circular saw guide)
- Kreg R3 pocket hole jig kit
- Shop Fox Hanging Air Filter
- 2HP Dust Collector
- 1 Micron bag
- Speed square
- 11″ Digital protractor
- Digital Angle Gauge
- Classic steel ruler (cork backed)
- Taper jig
- Flush cut saw
- 90˚ corner clamp (4 pack)
- Box Cutters (for eva foam)
3d Printing/CNC/Laser
- Glowforge (laser)
- X-Carve (CNC)
- Ultimaker 2 Extended 3D printer
- Ultimaker 3
- Original Prusa i3 MK 3
- Form1+ SLA 3D printer
- Silhouette Portrait (vinyl cutter)
- All filaments, 3d printing supplies from MatterHackers
Electronics
- Arduino Uno (just the Uno)
- Arduino Uno Kit
- Arcade buttons
- Raspberry Pi 3
- Multimeter
- Wire
- jumpers (Male to Female)
- Soldering iron
- Third hand kit
- Wire strippers (not the ones I have, but good ones)
- Thin solder
- Anti static mat
- Fiskars cutting mat
- Plastic parts cabinet (24 drawer)
- Plastic parts cabinet (64 drawer)
- Precision Screw driver kit