
Getting back to work on this building project felt good, even though I still had no idea what to call it. A pool house? A shed? Some kind of backyard structure that defies easy categorization? Whatever it was, it had walls and sheathing from the last video, and that meant it was finally time to tackle the roof. I knew from the start that roofing was going to be interesting, mainly because I spotted a problem before I even picked up a tool. Those special order 20-foot 2x8s that I needed for the rafters had just been delivered, and while I had verified with an architect that they would work structurally across that span, I never really thought about the practical challenge of physically lifting them 12 feet up onto the building by myself.
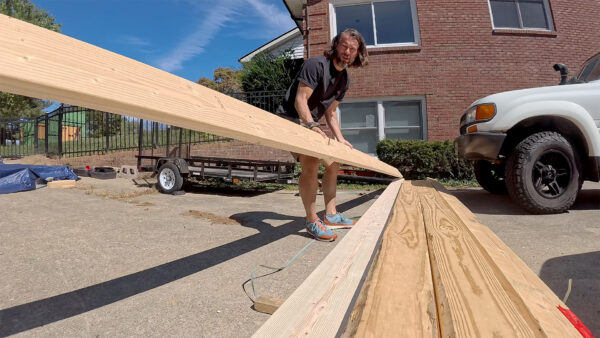
The boards arrived and I moved them closer to the structure to get a feel for the weight. They turned out to be not quite as heavy as I expected, which was a relief. I could have called in some help to lift them up there, but I was trying to do as much of this build solo as I could. Not for any particular reason other than curiosity about what I was capable of handling on my own. The plan started forming in my head to feed them through the back window opening and then somehow angle them up and into place. It sounded reasonable enough in theory, but before I could get any of them up there, I had to cut the notches in each rafter first.
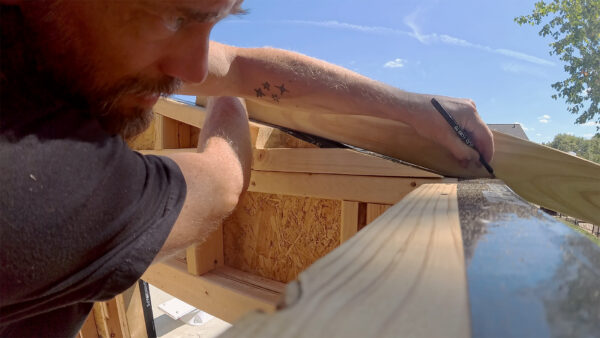
This is where things got complicated. I had watched plenty of people cut rafters and notch them using a speed square, and every time I thought I understood the process, it just never quite clicked in my brain. With only one shot at getting these cuts right and no extra 20-foot boards sitting around as backup, I decided to take a different approach. Instead of trying to master the speed square method on the fly, I would put one full board up there temporarily, mark exactly where the notches needed to be, bring it back down to cut it, and then use that first one as a template for all the rest. It felt like more work, but the alternative was potentially ruining an expensive piece of lumber and having to wait for another special order delivery.
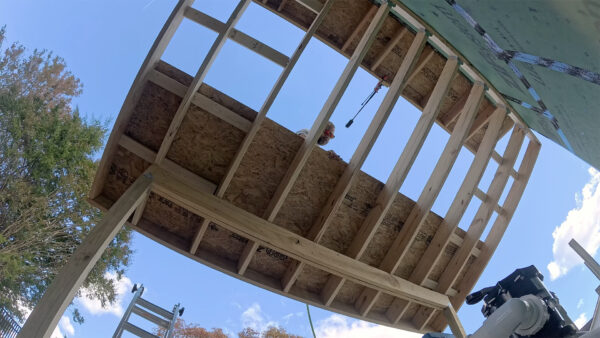
Getting that first board up there solo was its own adventure. I threaded one end through the window opening and started the awkward process of lifting and angling until I could rest it on both the header beam and the ledger on the building. It took some creative maneuvering and a lot of hoping that it would not slide off and fall while I scrambled around trying to position it correctly. Once I had it roughly in place, I marked out where the notches needed to be cut, both at the top and bottom. Then I brought it back down and cut just the top notch first as a test. My thinking was that I could put it back up there with only the top notch cut, verify that my markings for the bottom notch were accurate, and then bring it down one more time to finish the cuts. More trips up and down, sure, but way less risk of messing everything up.
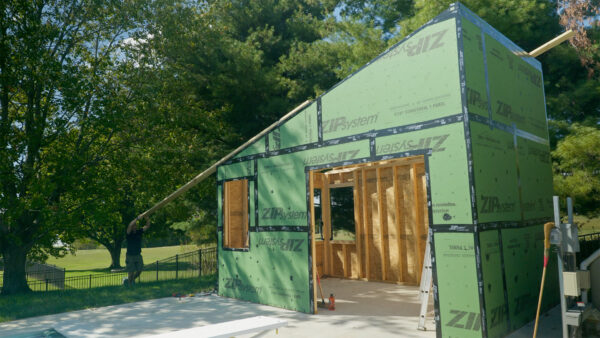
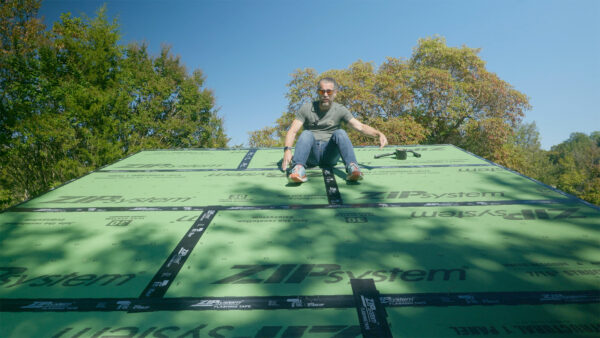
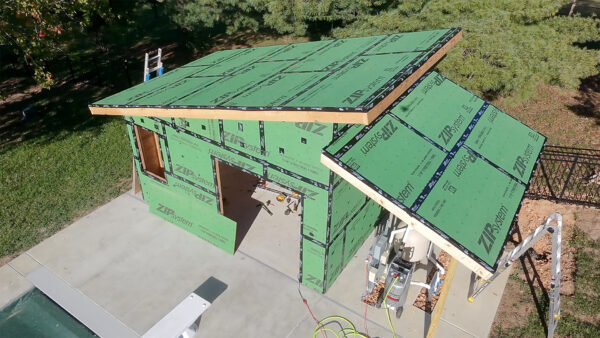
After getting that first rafter fully notched and confirmed as correct, the rest of the process went surprisingly smooth. I used it as my template and transferred those cuts to all the other rafters, then began moving them all into place on the roof and nailing them together to create the roof. Altogether not as difficult as I had expected. Then came the sheathing similar to what was done on the walls below. The next step was to do all of that again, but for a smaller roof that covers the pool equipment. I anchored support beams in concrete and got started on a lower ledger to support the second roof. I may have made a slight mistake measuring this one, but it turned out ok anyway.

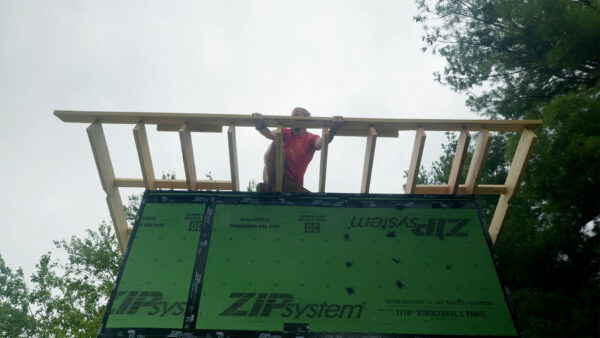
Once I had the ledger installed and all my rafters properly notched, it was time to start setting them in place. The system I came up with using temporary supports and carefully positioning each beam worked well enough, even if it looked a little sketchy while I was doing it. Each rafter went up one at a time, got checked for proper fit, and then secured in place. This side of the roof ended up being very similar to the main roof I had already built, with the exception of the outrigger pieces that extend past the walls. On the big roof I had to build those on top and slide them into position, but on this smaller section I could just construct them in place which saved some headaches.
The whole experience reinforced something I have been learning throughout this entire build. Most of this stuff turns out to be not nearly as hard as it seems like it should be, at least most of the time. Sure, there are moments of confusion and mistakes that need fixing, but the actual work of putting boards together and making them fit is more straightforward than my brain wants to believe before I start. By the end of the day I had a complete roof structure on the entire building, and that felt really good. Everything from the framing to the sheathing to the rafters was similar to work I had done on other projects, so even though it was challenging, it was not totally foreign territory.
What comes next though is a completely different story. The roof structure might be done, but now I have to cover and wrap the entire thing with metal roofing, and that is something I have exactly zero experience with. I need to figure out all the different components, how to properly wrap everything, and most importantly how to guide water away from all the places it should not be going. This is definitely going to require some research and probably some trial and error. If you have any good recommendations for channels or videos that explain metal roofing in a clear way, I would really appreciate you leaving a comment. Since these videos come out a couple weeks after I do the actual work, your suggestions might be a little late for this particular project, but they will definitely help me on future builds.
Thanks for following along with this build. It has been a learning process every step of the way, and having people share their knowledge in the comments has been incredibly helpful. I will catch you in the next video where I tackle that metal roofing challenge. Now, go make something awesome!
TOOLS
(purchasing via these affiliate links supports ILTMS)
Woodworking
- SawStop cabinet saw
- 8″ Dado stack
- Skil circular saw
- Dewalt 20v drill driver combo
- Dewalt Miter Saw
- Jet Wood Lathe 12×21
- Carbide lathe tool set
- Countersink drill bits
- Dewalt DW735 benchtop planer
- Orbital Sander
- Pancake compressor/nail gun combo
- Dremel tool
- Incra box joint jig
- 54″ Drywall T-Square
- Push Blocks
- Jigsaw
- Shop Fox 6″ Jointer
- Grizzly 14″ Bandsaw
- Grizzly Drill Press (WAAAAY overpriced (3x) on Amazon, buy from Grizzly directly.)
- Jet Drum Sander
- Kreg Rip Cut (circular saw guide)
- Kreg R3 pocket hole jig kit
- Shop Fox Hanging Air Filter
- 2HP Dust Collector
- 1 Micron bag
- Speed square
- 11″ Digital protractor
- Digital Angle Gauge
- Classic steel ruler (cork backed)
- Taper jig
- Flush cut saw
- 90˚ corner clamp (4 pack)
- Box Cutters (for eva foam)
Finishes & Adhesives
- Spray lacquer
- 100% pure tung oil
- Formby’s tung oil finished (tung oil/varnish)
- Danish oil
- CA Glue (medium)
- CA Activator
- Barge Contact Cement
- Critter Spray Gun
- Polycrylic
- Polyurethane
- Spar Urethane
3d Printing/CNC/Laser
- Glowforge (laser)
- X-Carve (CNC)
- Ultimaker 2 Extended 3D printer
- Ultimaker 3
- Original Prusa i3 MK 3
- Form1+ SLA 3D printer
- Silhouette Portrait (vinyl cutter)
- All filaments, 3d printing supplies from MatterHackers
Welding
- MIG welder *
- TIG welder
- Welding mask (auto darkening)
- Welding gloves
- Welding magnet
- Angle grinder *
- Cut off wheels
- Metal cutting bandsaw *
- 10″ Evolution Miter Saw for cutting Steel, Aluminum, Wood, etc.
Electronics
- Arduino Uno (just the Uno)
- Arduino Uno Kit
- Arcade buttons
- Raspberry Pi 3
- Multimeter
- Wire
- jumpers (Male to Female)
- Soldering iron
- Third hand kit
- Wire strippers (not the ones I have, but good ones)
- Thin solder
- Anti static mat
- Fiskars cutting mat
- Plastic parts cabinet (24 drawer)
- Plastic parts cabinet (64 drawer)
- Precision Screw driver kit