
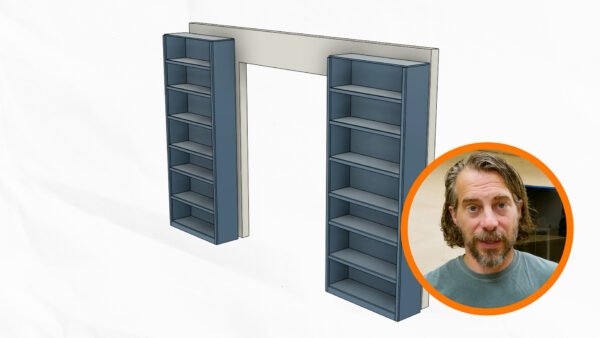
Last week I installed some sliding doors to separate our music room from the rest of the house. But looking at them every day, I realized they were pretty bland. So I decided to hide them completely by building a massive library wall. The plan was simple – build floor-to-ceiling shelves on both sides of the doors and connect them with shelving across the top. When it was done, you’d never know there were doors behind there at all.

Built-ins are always custom by nature. They’re made to fit your specific space, so my measurements won’t help you much. But I can share the process and some tips I learned along the way. The basic idea is to build modular units that you can move around and install piece by piece. For this project, I made two tall shelving units for each side of the doors, then built a smaller unit to bridge across the top once everything was in place.
I used half-inch plywood for all the main panels and added face frames made from 1×2 pine. Those face frames aren’t just for looks – they add serious strength to the shelves. A 36-inch shelf made from half-inch plywood will sag over time without reinforcement. But when you glue and nail a face frame to the front, it becomes way more rigid. The face frame also hides the plywood edges and makes the whole thing look more substantial and professional.
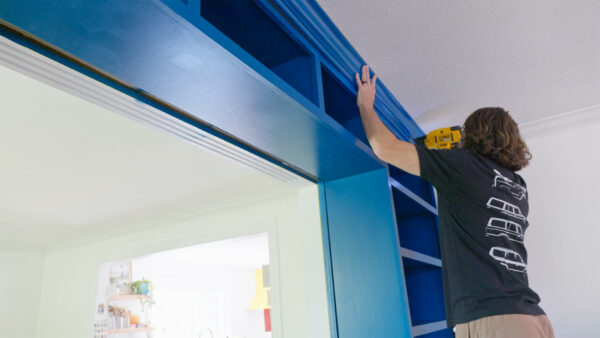
The assembly was straightforward – glue and brad nails for the main boxes. Some people might use pocket holes or dowels, but brad nails work fine for built-ins since they get extra support from being attached to the walls. I built the face frames piece by piece, starting with the sides and working my way in. The only tricky part was remembering to leave the very top piece off since I planned to run one continuous board across all three units once they were installed.

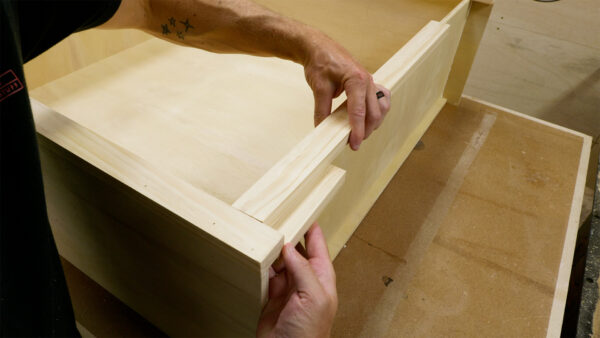
Making adjustable shelves added another layer of complexity. Each shelf needs its own face frame, but it has to be slightly narrower than the opening so you can slide it in and out. I cut the shelf pieces about an eighth inch narrower than the opening and centered the face frames on the front. It took some test fitting to get the sizing just right. Nothing worse than building a shelf that won’t actually fit into your finished cabinet.

Here’s where things got interesting. My walls weren’t square – they never are. The floor had a slight slope, and the walls bowed out a bit at the bottom. This meant I had to use shims everywhere to get the units level and plumb. I needed consistent gaps around the doors, so I spent a good amount of time adjusting and readjusting before screwing everything to the walls and floor. This is probably the most important part of installing built-ins – taking the time to get them perfectly positioned before locking them down.
I decided to spray paint everything instead of using a brush and roller. After refinishing our kitchen cabinets with a spray gun, I learned it’s absolutely worth the cleanup hassle for big projects like this. The finish comes out way more consistent, and you can get into all those inside corners without brush marks. If you’re thinking about building your own built-ins, seriously consider getting a spray gun. It turned what would have been hours of brushing into a much quicker job with better results.
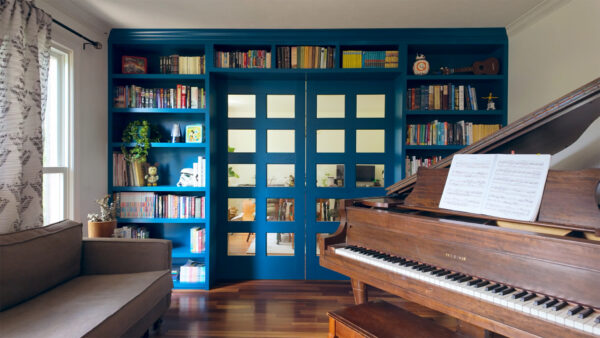
The final touch was adding crown molding across the top. I reused the crown from the original wall but painted it to match the shelves. I know some people hate painted crown, but I wanted the whole library wall to look like one cohesive unit. Once I loaded up the shelves with books and some decorations, the transformation was complete. The room went from having obvious sliding doors to looking like a proper library. Total cost was under $400 for wood and about $50 for paint – not bad for completely changing the feel of a room. Thanks for following along with me this week. Now, go make something awesome!
TOOLS
(purchasing via these affiliate links supports ILTMS)
Woodworking
- SawStop cabinet saw
- 8″ Dado stack
- Skil circular saw
- Dewalt 20v drill driver combo
- Dewalt Miter Saw
- Jet Wood Lathe 12×21
- Carbide lathe tool set
- Countersink drill bits
- Dewalt DW735 benchtop planer
- Orbital Sander
- Pancake compressor/nail gun combo
- Dremel tool
- Incra box joint jig
- 54″ Drywall T-Square
- Push Blocks
- Jigsaw
- Shop Fox 6″ Jointer
- Grizzly 14″ Bandsaw
- Grizzly Drill Press (WAAAAY overpriced (3x) on Amazon, buy from Grizzly directly.)
- Jet Drum Sander
- Kreg Rip Cut (circular saw guide)
- Kreg R3 pocket hole jig kit
- Shop Fox Hanging Air Filter
- 2HP Dust Collector
- 1 Micron bag
- Speed square
- 11″ Digital protractor
- Digital Angle Gauge
- Classic steel ruler (cork backed)
- Taper jig
- Flush cut saw
- 90˚ corner clamp (4 pack)
- Box Cutters (for eva foam)
Finishes & Adhesives
- Spray lacquer
- 100% pure tung oil
- Formby’s tung oil finished (tung oil/varnish)
- Danish oil
- CA Glue (medium)
- CA Activator
- Barge Contact Cement
- Critter Spray Gun
- Polycrylic
- Polyurethane
- Spar Urethane
3d Printing/CNC/Laser
- Glowforge (laser)
- X-Carve (CNC)
- Ultimaker 2 Extended 3D printer
- Ultimaker 3
- Original Prusa i3 MK 3
- Form1+ SLA 3D printer
- Silhouette Portrait (vinyl cutter)
- All filaments, 3d printing supplies from MatterHackers
Welding
- MIG welder *
- TIG welder
- Welding mask (auto darkening)
- Welding gloves
- Welding magnet
- Angle grinder *
- Cut off wheels
- Metal cutting bandsaw *
- 10″ Evolution Miter Saw for cutting Steel, Aluminum, Wood, etc.
Electronics
- Arduino Uno (just the Uno)
- Arduino Uno Kit
- Arcade buttons
- Raspberry Pi 3
- Multimeter
- Wire
- jumpers (Male to Female)
- Soldering iron
- Third hand kit
- Wire strippers (not the ones I have, but good ones)
- Thin solder
- Anti static mat
- Fiskars cutting mat
- Plastic parts cabinet (24 drawer)
- Plastic parts cabinet (64 drawer)
- Precision Screw driver kit