
With the pool house finally wrapped up, the backyard was starting to come together — but it still needed some life. The wall behind the pool area was just sitting there looking bare, and there was nowhere to sit while you waited your turn at the diving board. So I came up with a plan: build a couple of concrete planters to frame out the wall, then connect them with a wooden bench. It would be a mix of concrete and wood, and if it worked, it would add some real character to the space. I’d never cast concrete before, so naturally I decided to also make it way more complicated than it needed to be. That’s just how I operate.
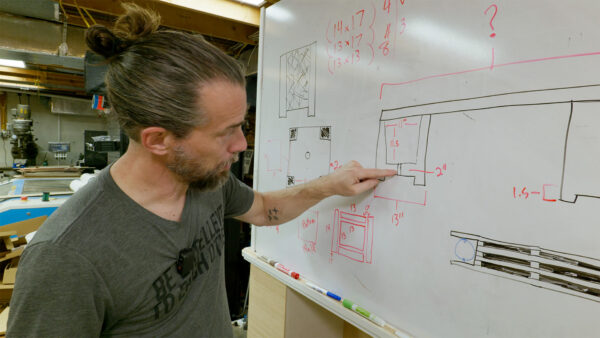
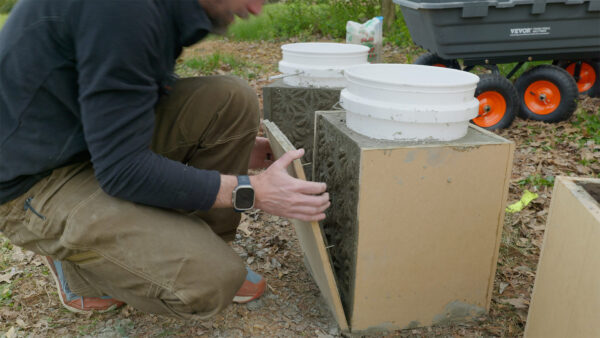
The idea was to build a form out of MDF — basically a box with some clever inserts. On the bottom, I stacked a couple of sheets with the corners cut out so the concrete would fill those gaps and create little feet. I also glued a short section of PVC pipe in the center of the base to act as a drain hole, and then a five-gallon bucket would sit on top of that pipe to create the void where the plants would eventually go. Everything around the bucket would get packed with concrete. At least, that was the theory. I kept telling myself “theoretically” because I genuinely had no clue if any of this was going to work the way I imagined it.
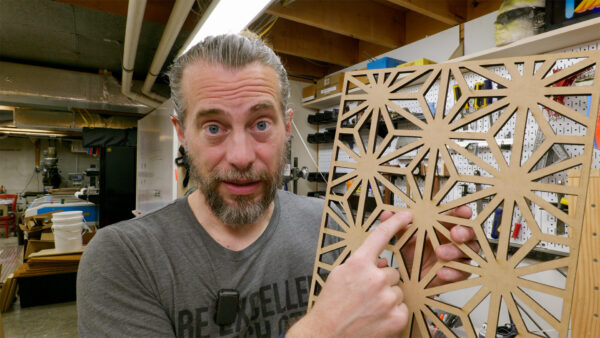
Now here’s where I made it harder on myself. Instead of building a plain box with flat sides, I decided to laser-cut a Japanese-style geometric pattern and glue it to the inside walls of the form. The idea was that when the concrete set and I pulled the form off, the pattern would be raised on the surface of the planter. These cuts were deep and had sharp corners, which meant the concrete probably wouldn’t fill every little gap perfectly. But I was actually okay with that — I figured if it came out a little crumbly, a little rough, a little incomplete, it might look kind of ancient and weathered in a cool way. Sometimes imperfection is the whole aesthetic. That was my hope, anyway.
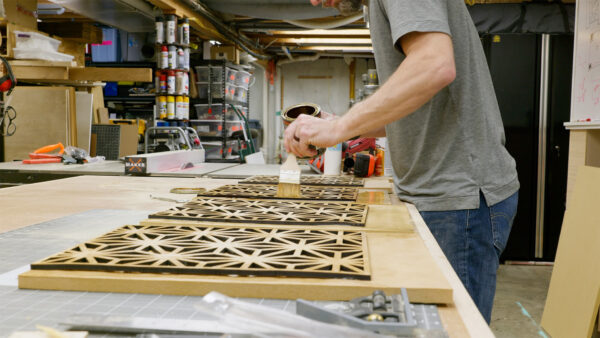
Before assembling anything, I had to deal with the MDF. If you’ve ever worked with MDF, you know it soaks up water like a sponge, which is a death sentence when you’re pouring wet concrete against it. I hit every surface with several coats of spray lacquer — especially the detailed pattern pieces — and then followed that up with a layer of paste wax on top. Was it perfect coverage? Definitely not. But the goal was just to create enough of a barrier between the dry MDF and the wet concrete that the form wouldn’t swell up and fall apart before the concrete had time to set. Each wall panel got screwed on from the outside so I could remove them one at a time later without having to yank the whole planter out of the mold in one piece.
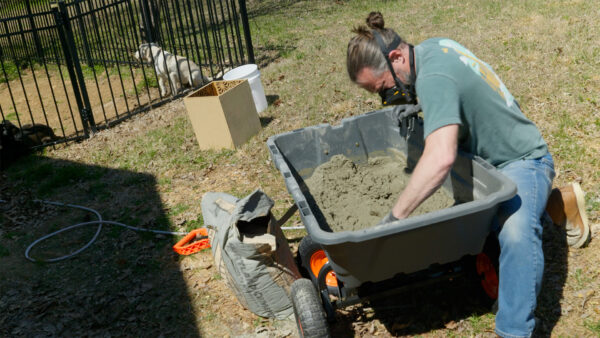
For the concrete mix, I went with Portland cement and sand at a two-to-one ratio — no aggregate, just a fine casting mix. I added a product called flow control to help it move into all the tight detail work of the pattern without having to add so much water that it weakened the mix. I also threw in some colorant to darken it up, which probably just added another variable to an already experimental process. Mixing was a bit of a struggle because the cart I used had grooves in the bottom, so I spent extra time digging into those channels to make sure everything was evenly combined. Once it was mixed, I packed the concrete into the detailed sides of the mold first, vibrated it with a jigsaw to work out air bubbles, and then set the bucket in and filled around it. The bucket ended up sitting off-center, so the walls were thicker on one side than the other. Not ideal, but I pressed on.
After about 24 hours — yes, I know they recommend 48, but patience has never been my strongest trait — I started pulling the form apart. The pattern actually showed up on the sides, and honestly, it looked pretty great. Some of the detail had broken away, but what was left had that rough, textured look I was hoping for. The feet, however, did not survive. I hadn’t thought through how to remove that bottom insert without putting pressure on them, and the mix wasn’t strong enough to handle it. They snapped right off. Not the end of the world though — flat bottoms work just fine. The bigger issue was the second planter. When I cut the bucket out, a crack shot across the top and down both sides. In a split second the whole thing was fractured. I thought about gluing it back together with landscape adhesive, but if it cracked that easily, I didn’t trust it to hold up with soil, water, and someone sitting on a bench above it.
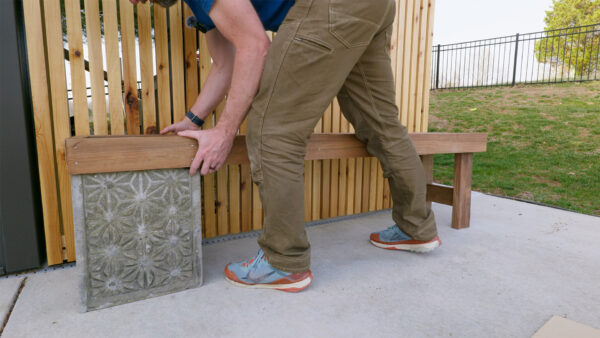
I’ll be honest, I almost let that ruin my day. But once I looked at the cracked planter for a while, I realized it actually looked kind of cool — like ancient ruins. If you put a trailing vine in there that grew down over the cracks, it could be a whole vibe. So I set it aside for a future project and pivoted to a new plan. Instead of a bench spanning two planters, I’d build a bench off the side of the one good planter with its own legs on the open end. I ripped some lumber, used scrap pieces as spacers between the slats, and connected everything with cross pieces underneath. The structure came together fast, and when I set it against the planter it fit perfectly. Simple, sturdy, and honestly better looking than the original symmetrical plan.
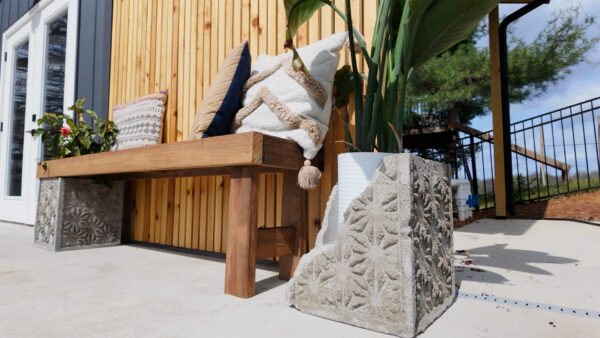
Even with the cracked planter and the change of plans, I’m really happy with how this turned out. The asymmetry of having one planter and a bench extending off of it actually looks more intentional and interesting than two matching planters would have. The concrete pattern came out with enough detail to be striking without looking like it was trying too hard. I’ve definitely got a lot to learn about concrete casting — the sand consistency, the mix ratio, the demolding process — and I’d love to hear from anyone who’s done this before and has tips for next time, because I absolutely want to try it again. Thanks for following along with the build. Now, go make something awesome!
TOOLS
(purchasing via these affiliate links supports ILTMS)
Woodworking
- SawStop cabinet saw
- 8″ Dado stack
- Skil circular saw
- Dewalt 20v drill driver combo
- Dewalt Miter Saw
- Jet Wood Lathe 12×21
- Carbide lathe tool set
- Countersink drill bits
- Dewalt DW735 benchtop planer
- Orbital Sander
- Pancake compressor/nail gun combo
- Dremel tool
- Incra box joint jig
- 54″ Drywall T-Square
- Push Blocks
- Jigsaw
- Shop Fox 6″ Jointer
- Grizzly 14″ Bandsaw
- Grizzly Drill Press (WAAAAY overpriced (3x) on Amazon, buy from Grizzly directly.)
- Jet Drum Sander
- Kreg Rip Cut (circular saw guide)
- Kreg R3 pocket hole jig kit
- Shop Fox Hanging Air Filter
- 2HP Dust Collector
- 1 Micron bag
- Speed square
- 11″ Digital protractor
- Digital Angle Gauge
- Classic steel ruler (cork backed)
- Taper jig
- Flush cut saw
- 90˚ corner clamp (4 pack)
- Box Cutters (for eva foam)
Finishes & Adhesives
- Spray lacquer
- 100% pure tung oil
- Formby’s tung oil finished (tung oil/varnish)
- Danish oil
- CA Glue (medium)
- CA Activator
- Barge Contact Cement
- Critter Spray Gun
- Polycrylic
- Polyurethane
- Spar Urethane
3d Printing/CNC/Laser
- Glowforge (laser)
- X-Carve (CNC)
- Ultimaker 2 Extended 3D printer
- Ultimaker 3
- Original Prusa i3 MK 3
- Form1+ SLA 3D printer
- Silhouette Portrait (vinyl cutter)
- All filaments, 3d printing supplies from MatterHackers
Welding
- MIG welder *
- TIG welder
- Welding mask (auto darkening)
- Welding gloves
- Welding magnet
- Angle grinder *
- Cut off wheels
- Metal cutting bandsaw *
- 10″ Evolution Miter Saw for cutting Steel, Aluminum, Wood, etc.
Electronics
- Arduino Uno (just the Uno)
- Arduino Uno Kit
- Arcade buttons
- Raspberry Pi 3
- Multimeter
- Wire
- jumpers (Male to Female)
- Soldering iron
- Third hand kit
- Wire strippers (not the ones I have, but good ones)
- Thin solder
- Anti static mat
- Fiskars cutting mat
- Plastic parts cabinet (24 drawer)
- Plastic parts cabinet (64 drawer)
- Precision Screw driver kit