
No matter what kind of work you do, we probably both have one thing in common: time-consuming repetitive tasks. One of my biggest annoyances is trying to roll up huge 36-inch wide paper woodworking templates to mail them out to customers. I roll them up super tight to fit in the cardboard tube, but then one end always ends up uneven and longer than the other, making them a pain to stuff in the tube. I deal with this all the time trying to ship these out (and they go great with our digital woodworking plans).
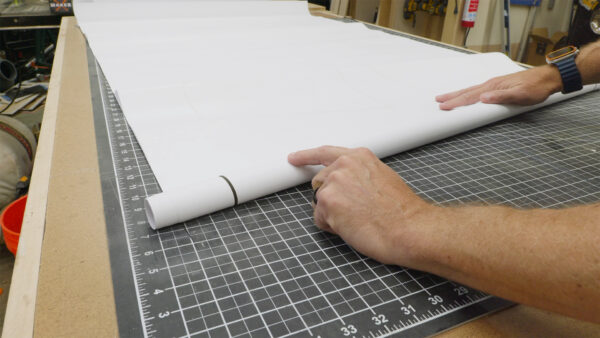
I decided I needed to solve this problem once and for all, so I set out to design a simple bench-top machine that could roll up multiple sheets of paper perfectly straight and tight every time. My first attempt was pretty basic – just a dowel with a slot cut down the middle so I could slide the paper through and start rolling it up. That worked okay for a single sheet, but I quickly realized I needed some way to keep the whole roll from unspooling as I went.
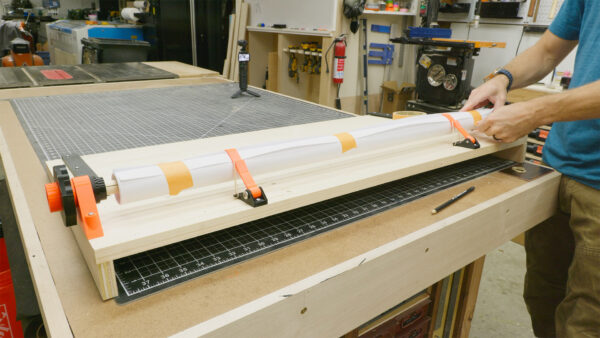
So for version two, I added these little guide rails on each side to help align the paper, and then came up with a spring-loaded arm that could press down on the roll to keep it tight. I also designed a handle piece that could lock onto the end of the dowel, allowing me to roll it smoothly without the whole thing spinning apart. This setup worked way better, but I noticed that as the roll got bigger, it started to get too close to the base, limiting how much paper I could fit.
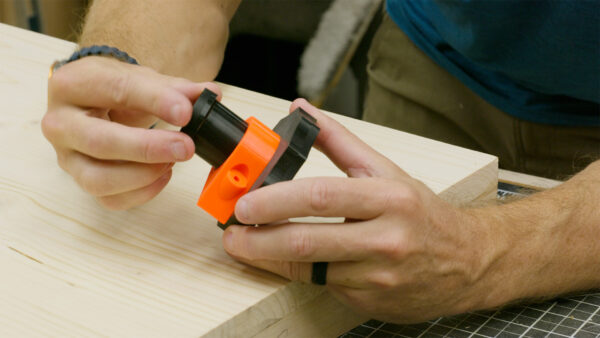
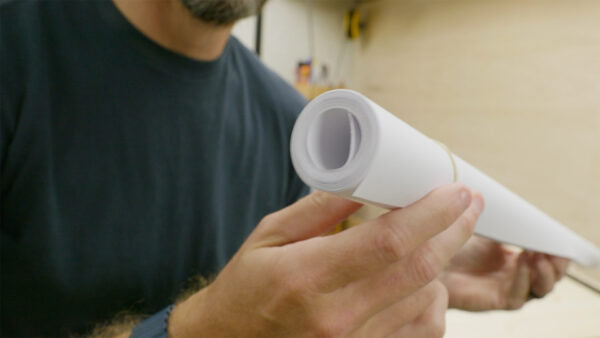
To fix that, I printed out some taller mounts to elevate the whole mechanism, giving me more clearance underneath. I also tweaked the guide rails to have a smoother angle for feeding the paper in. With these changes, I was finally able to roll up multiple full sets of my woodworking plans without any issues. The end result is a perfectly tight, evenly wound bundle that slides right into the mailing tube.
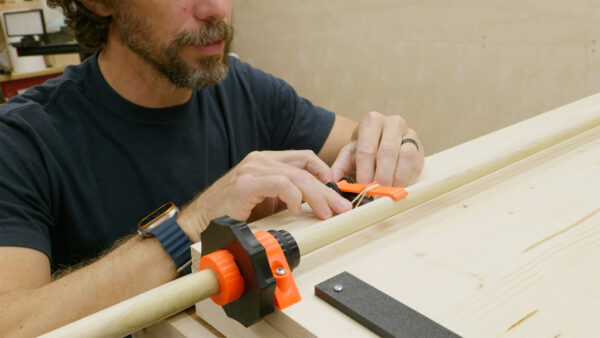
The key innovation that really makes this work is the spring-loaded arm with the rubber band. That provides just the right amount of tension to keep the roll from unraveling, but still lets me load the paper in easily. I can just hook a rubber band over the arm to hold it in place, then release it when I’m ready to start rolling. Once the roll is done, I can quickly slip a couple more rubber bands over each end to lock it all in place.
I have to admit, I’m pretty proud of how well this little machine turned out. It’s such a simple solution, but it’s completely eliminated one of my biggest workflow headaches. No more struggling to force those uneven rolls into the mailing tubes. Everything comes out tight, straight, and ready to ship.
Of course, this was just my first real attempt at designing this kind of paper rolling setup, so I’m sure there’s still TONS of room for improvement. The initial paper loading process could probably be streamlined even further. And I bet I could tweak the guide rails or other components to make it even more user-friendly. But hey, at least I’ve solved the main problem – no more uneven, frustrating paper rolls.
Anyway, I hope this inspires you to think of ways you can improve your own annoyingly repetitive tasks. And if you’ve got any other ideas on how I could improve this setup, definitely let me know in the comments. I’m always looking to make my workflow a little bit better and easier. Thanks for joining me here, now go make something awesome!
TOOLS
(purchasing via these affiliate links supports ILTMS)
Woodworking
- SawStop cabinet saw
- 8″ Dado stack
- Skil circular saw
- Dewalt 20v drill driver combo
- Dewalt Miter Saw
- Jet Wood Lathe 12×21
- Carbide lathe tool set
- Countersink drill bits
- Dewalt DW735 benchtop planer
- Orbital Sander
- Pancake compressor/nail gun combo
- Dremel tool
- Incra box joint jig
- 54″ Drywall T-Square
- Push Blocks
- Jigsaw
- Shop Fox 6″ Jointer
- Grizzly 14″ Bandsaw
- Grizzly Drill Press (WAAAAY overpriced (3x) on Amazon, buy from Grizzly directly.)
- Jet Drum Sander
- Kreg Rip Cut (circular saw guide)
- Kreg R3 pocket hole jig kit
- Shop Fox Hanging Air Filter
- 2HP Dust Collector
- 1 Micron bag
- Speed square
- 11″ Digital protractor
- Digital Angle Gauge
- Classic steel ruler (cork backed)
- Taper jig
- Flush cut saw
- 90˚ corner clamp (4 pack)
- Box Cutters (for eva foam)
Finishes & Adhesives
- Spray lacquer
- 100% pure tung oil
- Formby’s tung oil finished (tung oil/varnish)
- Danish oil
- CA Glue (medium)
- CA Activator
- Barge Contact Cement
- Critter Spray Gun
- Polycrylic
- Polyurethane
- Spar Urethane
3d Printing/CNC/Laser
- Glowforge (laser)
- X-Carve (CNC)
- Ultimaker 2 Extended 3D printer
- Ultimaker 3
- Original Prusa i3 MK 3
- Form1+ SLA 3D printer
- Silhouette Portrait (vinyl cutter)
- All filaments, 3d printing supplies from MatterHackers